
Table of Contents
9 Yoga Asanas to do when you are bloated
1. Pawanmuktasana (Wind-Relieving Pose)

Steps:
- Lie flat on your back on a yoga mat.
- Stretch your legs out and keep your arms by your sides.
- Bend your right knee and bring it towards your chest.
- Interlock your fingers around your knee and press it gently against your abdomen.
- Lift your head and shoulders, bringing your nose close to your knee.
- Hold the position for 10-20 seconds while breathing deeply.
- Lower your head and release the leg. Repeat with the left leg.
- For a complete stretch, bring both knees to your chest and hug them while holding the pose.
Benefits:
- Relieves trapped gas and reduces bloating.
- Stimulates the intestines and improves digestion.
- Massages the abdominal organs gently.
2. Balasana (Child’s Pose)
Steps:
- Kneel on the floor and sit back on your heels.
- Keep your knees hip-width apart or wider for comfort.
- Stretch your arms forward, lowering your torso to rest on your thighs.
- Place your forehead on the floor and relax your shoulders.
- Hold the pose for 1-2 minutes, breathing deeply.
Benefits:
- Relaxes the abdominal muscles and relieves tension.
- Helps release trapped gas by gently compressing the stomach.
- Calms the mind and reduces stress, which can contribute to bloating.
3. Marjariasana-Bitilasana (Cat-Cow Pose)
Steps:
- Begin on all fours with your hands aligned under your shoulders and knees under your hips.
- Inhale and arch your back, lifting your tailbone and chest upward (Cow Pose).
- Exhale and round your spine, tucking your chin towards your chest (Cat Pose).
- Repeat the cycle for 8-10 breaths, moving with your breath.
Benefits:
- Improves circulation to the digestive organs.
- Massages the abdominal area and promotes intestinal movement.
- Releases tension in the lower back and abdomen.
4. Ardha Matsyendrasana (Half Lord of the Fishes Pose)
Steps:
- Sit with your legs extended straight in front of you.
- Bend your right knee and place your right foot outside your left thigh.
- Place your right hand on the floor behind you for support.
- Cross your left elbow over your right knee and twist your torso to the right.
- Look over your right shoulder and hold the pose for 20-30 seconds.
- Release and repeat on the other side.
Benefits:
- Enhances digestion by compressing and releasing the abdominal organs.
- Relieves bloating and detoxifies the body.
- Improves spinal flexibility.
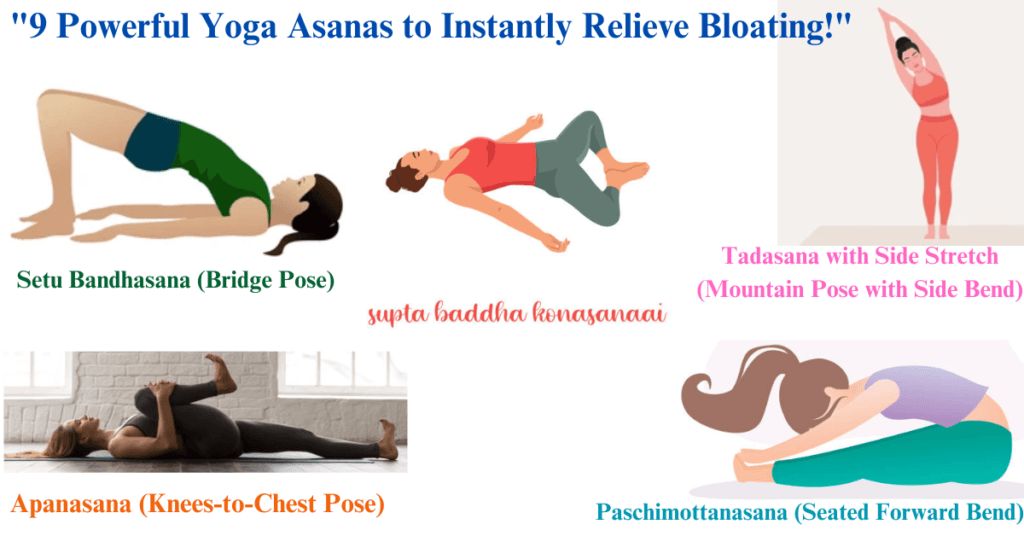
5. Setu Bandhasana (Bridge Pose)
Steps:
- Lie on your back with your knees bent and feet hip-width apart.
- Place your arms by your sides, palms facing down.
- Press your feet into the mat and lift your hips towards the ceiling.
- Interlace your fingers underneath your back for extra support.
- Hold the pose for 20-30 seconds, breathing deeply.
- Lower your hips gently to the mat.
Benefits:
- Opens the abdominal area, relieving pressure and bloating.
- Stimulates the digestive organs.
- Strengthens the back and reduces stress.
6. Apanasana (Knees-to-Chest Pose)
Steps:
- Lie flat on your back with your legs extended.
- Bring both knees to your chest and hug them with your arms.
- Gently rock side to side to massage your lower back and abdomen.
- Hold for 1-2 minutes, breathing deeply and slowly.
Benefits:
- Eases trapped gas and promotes digestion.
- Relaxes the abdominal muscles.
- Soothes discomfort and bloating.
7. Supta Baddha Konasana (Reclining Bound Angle Pose)
Steps:
- Lie on your back and bring the soles of your feet together.
- Allow your knees to fall outward, creating a diamond shape with your legs.
- Place your arms by your sides or on your stomach.
- Hold the pose for 1-2 minutes, breathing deeply.
Benefits:
- Opens up the hips and relaxes the abdominal region.
- Promotes blood flow to the digestive organs.
- Helps alleviate bloating and improves relaxation.
8. Paschimottanasana (Seated Forward Bend)
Steps:
- Sit on the floor with your legs extended straight in front of you.
- Inhale and stretch your arms upward to lengthen your spine.
- Exhale and fold forward, reaching for your feet or ankles.
- Keep your back straight and avoid straining.
- Hold the pose for 20-30 seconds, breathing deeply.
Benefits:
- Stimulates the digestive organs and reduces abdominal tension.
- Relieves constipation, a common cause of bloating.
- Calms the nervous system.
9. Tadasana with Side Stretch (Mountain Pose with Side Bend)
Steps:
- Stand tall with your feet hip-width apart.
- Inhale and raise your arms overhead, interlocking your fingers.
- Exhale and bend to your right, feeling a stretch along your left side.
- Hold for 10-15 seconds and return to the center.
- Repeat on the other side.
Benefits:
- Enhances circulation in the abdominal area.
- Relieves tension and bloating caused by poor posture.
- Improves flexibility in the sides and back.
Additional Tips for Practice:
- Perform these poses on an empty stomach or after a light meal.
- Stay hydrated to aid digestion and reduce bloating.
- Practice deep, mindful breathing during each pose to enhance relaxation.
- Start gently and avoid overstretching or holding poses for too long.
By integrating these poses into your routine, you can alleviate bloating naturally while improving your overall digestive health and well-being.
When practicing yoga asanas, especially to relieve bloating, certain precautions must be taken to ensure safety and effectiveness. Here are general and specific precautions for the mentioned poses:
General Precautions for Yoga Asanas
- Empty Stomach: Practice yoga on an empty stomach or at least 2-3 hours after a meal to avoid discomfort.
- Breathing: Breathe naturally and deeply throughout the practice; avoid holding your breath unless instructed.
- Comfort: Use a yoga mat for cushioning. If needed, use props like cushions, blocks, or straps for support.
- Pain: Stop immediately if you feel pain or severe discomfort in any pose.
- Medical Conditions: If you have any chronic conditions (like hernia, high blood pressure, or severe back pain), consult a doctor or a qualified yoga instructor before starting.
- Pregnancy: Certain poses may not be suitable for pregnant individuals; modifications or alternative poses should be used.
- Warm-Up: Perform light stretches to warm up your muscles before practicing these asanas.
Pose-Specific Precautions
1. Pawanmuktasana (Wind-Relieving Pose)
- Avoid if you have severe back pain, hernia, or recent abdominal surgery.
- Do not overpress the knees against the stomach; adjust pressure for comfort.
2. Balasana (Child’s Pose)
- Avoid if you have knee injuries or severe ankle pain.
- Use a cushion between your thighs and calves for added support if needed.
3. Marjariasana-Bitilasana (Cat-Cow Pose)
- Avoid excessive arching of the back if you have spinal injuries or severe neck pain.
- Move gently to avoid straining the wrists or shoulders.
4. Ardha Matsyendrasana (Half Lord of the Fishes Pose)
- Avoid if you have spinal disc problems or recent abdominal surgeries.
- Perform a gentle twist; do not forcefully rotate the spine.
5. Setu Bandhasana (Bridge Pose)
- Avoid if you have neck injuries or unhealed shoulder problems.
- Support your neck with a folded towel if it feels strained.
6. Apanasana (Knees-to-Chest Pose)
- Avoid if you have recent abdominal surgery or severe back issues.
- Keep the movements gentle, especially while rocking side to side.
7. Supta Baddha Konasana (Reclining Bound Angle Pose)
- Avoid if you have severe hip or knee pain.
- Use cushions under your knees for support if your hips feel strained.
8. Paschimottanasana (Seated Forward Bend)
- Avoid if you have severe lower back pain or sciatica.
- Keep your knees slightly bent if you find it difficult to reach your feet.
9. Tadasana with Side Stretch (Mountain Pose with Side Bend)
- Avoid overstretching to the sides if you have spinal or shoulder issues.
- Maintain a straight alignment to avoid straining your lower back.
Additional Tips
- Hydration: Stay hydrated before and after your practice to support digestion.
- Slow Progression: Move into poses gradually, allowing your body to adjust to each position.
- Relaxation: End your practice with Savasana (Corpse Pose) to relax your body and mind.
- Supervision: If you’re a beginner, practice under the guidance of a qualified instructor.
By following these precautions, you can safely practice these asanas and maximize their benefits for relieving bloating and improving digestion.
Conclusion
Bloating, while a common issue, can cause significant discomfort and disrupt daily activities. However, with the integration of yoga into your routine, you can address this problem naturally and effectively. The 9 powerful yoga asanas discussed here are specifically designed to not only alleviate bloating but also enhance overall digestive health.
Each pose works in harmony with your body, stimulating the digestive system, relieving trapped gas, and improving blood flow to the abdominal area. Additionally, yoga promotes relaxation, reduces stress—a common contributor to digestive issues—and strengthens core muscles, which play a vital role in maintaining digestive efficiency.
Practicing these asanas regularly can provide more than just physical relief. Yoga connects the body and mind, allowing you to become more attuned to your body’s needs and signals. This mindfulness can help identify triggers of bloating and improve your overall relationship with your body and food.
However, it’s important to approach yoga with patience and consistency. Start slow, follow proper techniques, and focus on deep, rhythmic breathing during each pose. Over time, you’ll find not only relief from bloating but also improved flexibility, better posture, and enhanced well-being.
Take charge of your health by incorporating these asanas into your daily routine. With dedication and mindfulness, you can reclaim comfort, boost energy levels, and pave the way for a healthier, more balanced life—one yoga session at a time!


